OK, I have a lot to say about the new matchbox sizzix die available April 1 through Stampin Up!
First and foremost, I LOVE it! It's the easiest thing to put together once you have your pieces, it comes with extra label pieces, you can stack them and make little chests of drawers (wish I had this when I was into Barbie's), and I'm sure that once everyone has a chance to work with them more, the possibilities will keep on coming in. It works just as well with DSP or cardstock, with mine I did need a different shim, and remembering that it's longer than 12", it did require 2 pieces of 5 1/2"x6 1/2" to put under my "sandwich", but once I figured that out, I made several, and I'll have a few different ideas for a couple of days, so please check back!
Now, with that said, I thought it would be fun to make one with the clear (medium) acetate also available April 1 through Stampin Up!, and use a clear bead from the Pretties kit as a drawer pull. In fact, I thought about making a stack of 3, but I put myself through so much torture, I stopped at one.
FIRST problem was locating clear acetate. I looked everywhere, was sure I knew where I'd put it, but didn't see it, checked several other locations, went back to location I was positive I'd left it, and all I saw was cardboard (any of you with me yet?). I did a little swearing under my breath, wandered around a little more, went back again, this time picking up cardboard, thinking acetate might be under it. Finally looking at cardboard, I realized that what I had in my hand was indeed the acetate I had purchased, but with it being clear, with tissue between it, I thought it was just left over cardboard. OK, problem solved, I cut acetate into 5 1/2" x 6 1/2" pieces, I have four, and have kept tissue between sheets so I don't lose them.
SECOND problem, knowing that acetate can scratch, and hearing people talk about how the multiple cuts into their cutting plates can sometimes leave ridges on their cardstock, I open up a brand new set of crystal clear extended cutting plates (any smiles out there?). I put one plate down, set the die down, go searching for acetate and can't find it.
THIRD problem, clear acetate with white tissue on a white table is nearly impossible to see. So I finally find it and set it onto the die, which is remarkably easy since it's see through and quite clingy, so it slides right into place. Then I go to put the top plate on, which is also very staticy (is that a word?), so the acetate moves and I lift the top plate off and can't find acetate (now very nicely clinging to clear cutting plate). I finally get it back together and get it cut.

OK, from here it's just my observations. The acetate is pretty thick and I just used the medium weight one. I used the cardboard the acetate came with, because with the way my Big Shot is calibrated, regular cardstock wasn't giving me any score lines. The cardboard worked great and I was able to see and score everything. On mine, the score lines needed to be reinforced by using the bone folder. Otherwise, the box wouldn't stay together. Once I scored and creased with the bone folder, it stayed pretty well. The addition of something in the box made it a lot easier to keep together (in this one I have 6 Easter Rolos-pretty colors). Sticky strip on the side of the cover worked really well, and is nearly impossible to see. I used crystal effects to adhere the bead, and once it had a chance to set up, it stayed just fine. In my picture it's still a little wet, so it's a little cloudy.
Having experienced what I did and knowing what to expect, I may make more, they look really cute, and I can't wait to figure out what to do with the labels that I got with each cut. I did waste a couple, since it took me awhile to get the right thickness in shims, but using something else as a test wouldn't give me the same thickness, so I don't know how else to test it. I can say that even with the cardboard thickness, none of my score lines came close to cutting through, so I can use the wasted cuts on other projects. I hope my experience will help you in your attempts. The good thing is, I'm still smiling!
 If you spend any time on Patty Bennett's blog (doesn't everyone), you'll know it's been a very traumatic week for her. Her son Jason just turned 18! I can't believe Patty has an 18 year old son, but I was fortunate enough to be invited to his birthday party and there were a bunch of nice kids celebrating so it must be true. I gave Jason a gift card, and knew I wanted it to be in a skinny tin, since I took a class where his mom showed us how to use them for that (and I still have a bunch of skinny tins), but they were pretty girly, and I know that wouldn't be appreciated, so I used the Stampin Up! Tailor Made Simply Scrappin Kit to make it as manly as possible.
  I also used the now retired Form and Function background stamp to stamp the front of the tin with Not Quite Navy craft ink, then embossed it with clear embossing powder. I haven't found anything that will keep embossing powder off the rest of the tin (I cleaned it with alcohol and used the embossing buddy), but since it's clear, it looks fine. Using the heat tool on metal gets really hot though, so be careful if you attempt it.
 For my final attempt to make it as guyish as possible, I die cut Jason's initials using the tag shaped self adhesive die cuts in the Tailor Made SS kit with the Serif Essentials alphabet and also in kraft cardstock, so I could float the letters on the belly band. I was happy with how it turned out. Not girly at all.


 The purse was a little bulky and wouldn't stay closed just by tucking the tab through the front, so I added another brad so it would catch on the cardstock. It stays together nicely now. I want to try this in a few more colors and a couple of other textures and probably in some DSP as well. I'll let you know what I come up with. I attached the grosgrain ribbon (from SAB) with a couple of coordinating brads. Too cute!

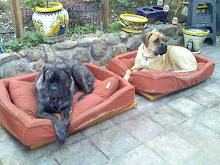
 Ahhh, success! Those were 2 very wet dogs, and why is it that when they are soaking wet, they choose THAT time to come and give you kisses???


 The dogs (Louie and Ella) had a great time wandering around, investigating cow pies (Ella), barking at the horses (mostly Louie), running in the water (both), and just being loose. At home they are couch potatoes (in fact both are snoring on the bed right now), but when they are here, not only do they get spoiled rotten by Aunt Ellen and Uncle Pat, they get to go pretty much anywhere they want. We did take precautions so they wouldn't interfere with the pregnant horses (no matter how big they are, the horses are a LOT bigger) or the cows (closed a gate), but it was great watching them run. Each morning I'd take them to the front pasture and Ella would run from one end to another chasing squirrels and just being a happy dog. Louie would follow her a short way, then turn around and come back to me (he's really very lazy). He watched her closely, and if she seemed to be having too much fun, he'd trot down to her and see what she was doing, but mostly he watched. Part of what was so great for me to see them enjoying themselves so much was the recovery of Louie from 4 ACL surgeries, and Ella's recovery from a spinal cord stroke last year. Truly amazing and inspiring.